「1: Pathfinding(経路探索) Breadth-First Search(幅優先探索) アルゴリズム p5.js – 導入」で見たサンプルを、p5.jsに移植していきます。
目次
ボードの描画
まずは、p5.jsを使って、4 x 4のグリッドをサンプル通りに描画する方法を見ていきます。
ボードに表示する正方形は次のSquareクラスで記述することにします。このクラスの大きな目的は指定された位置に正方形を描画することで、メソッドもプロパティの設定/取得と描画するものしか持っていません。ただしstatusとpathプロパティは別で、幅優先探索の機能に大いに貢献します。
Square.js
class Square {
    constructor(fromTop, fromLeft, w, status, path = []) {
        this.fromTop = fromTop;
        this.fromLeft = fromLeft;
        this.w = w;
        this.status = status;
        this.setColor(this.status);
        this.path = path;
    }
    setStatus(status) {
        this.status = status;
        this.setColor(this.status);
    }

    getStatus() {
        return this.status;
    }

    getFromTop() {
        return this.fromTop;
    }

    getFromLeft() {
        return this.fromLeft;
    }

    getPath() {
        return this.path;
    }

    setColor(status) {
        if (status === 'start') {
            this.col = 'yellow';
        }
        else if (status === 'goal') {
            this.col = 'red';
        }
        else if (status === 'obstacle') {
            this.col = 'black';
        }
        else if (status === 'empty') {
            this.col = 'white';
        }
        else if (status === 'visited') {
            this.col = 'lightgray';
        }
    }
    display() {
        fill(this.col);
        rect(this.fromLeft * this.w, this.fromTop * this.w, this.w, this.w);
        fill(100);
        text('(' + this.fromTop + ',' + this.fromLeft + ')', this.fromLeft * this.w + 15, this.fromTop * this.w + 40);
    }
}
ボードは次のsketch.jsで描画できます。Squareオブジェクトを16個作成し、それをgrid配列に入れて管理します。
// 4マス x 4マス = 正方形が16個
const gridSize = 4;
// 1マスの幅
let gridWidth;
// Squareオブジェクトを入れる配列
let grid = [];
// 開始用Squareオブジェクト
let startSquare
function setup() {
createCanvas(320, 320);
background(200);
stroke(120);
textSize(20);
// 1マスの幅を320/4 = 80にする
gridWidth = width / gridSize;
// Squareオブジェクトを16個、empty状態で作成して描画、
// grid配列に追加する
for (let i = 0; i < gridSize; i++) {
grid[i] = [];
for (let j = 0; j < gridSize; j++) {
const square = new Square(i, j, gridWidth, 'empty');
grid[i][j] = square;
square.display();
}
}
// Squareオブジェクトを設定、状態は上書きして表示
startSquare = grid[0][0];
startSquare.setStatus("start");
startSquare.display();
// ゴール用quareオブジェクトを設定、状態は上書きして表示
grid[2][2].setStatus("goal");
grid[2][2].display();
// 障害物用quareオブジェクトを設定、状態は上書きして表示
grid[1][1].setStatus("obstacle");
grid[1][1].display();
grid[1][2].setStatus("obstacle");
grid[1][2].display();
grid[1][3].setStatus("obstacle");
grid[1][3].display();
grid[2][1].setStatus("obstacle");
grid[2][1].display();
// grid配列を確認
print(grid[0]);
print(grid[1]);
print(grid[2]);
print(grid[3]);
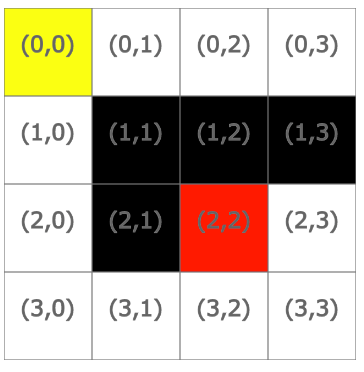
}これを実行すると、下図に示すグリッドが表示されます。
また[コンソール]には次の結果が出力されます。
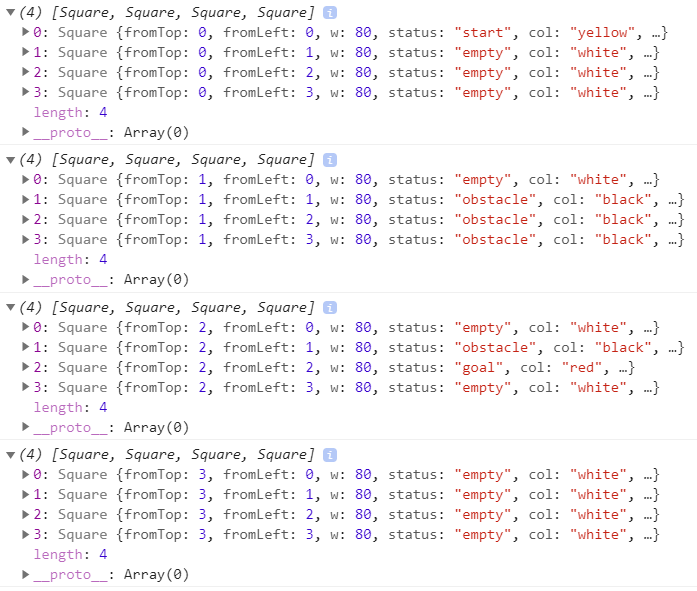
たとえば開始位置(0,0)の右にある正方形は、fromTopプロパティが0、fromLeftプロパティが1、statusプロパティが”empty”です。pathプロパティは指定していないので、デフォルトの空の配列が割り当てられます。
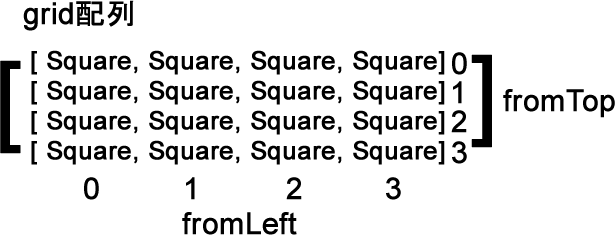
gridは2次元配列です。次元は変化する方向の数を意味し、今の場合には横と縦の2方向と考えることができます。grid配列に入れたSquareオブジェクトには、grid[fromTop][fromLeft]という方法でアクセスできます。たとえば(0,0)にある黄色の正方形には、grid[0][0]でアクセスできます。