この記事の詳しい内容には毎日新聞の「動物園をパトロール」ページから有料記事に進むことで読めます。
目次
概要
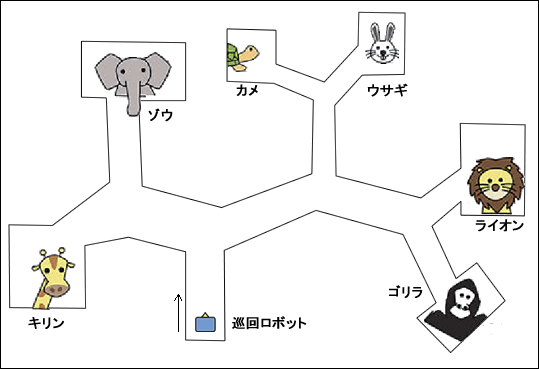
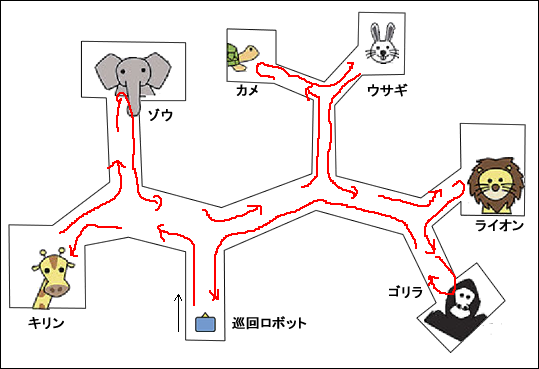
この動物園では、巡回ロボットが園内をパトロールします。ロボットは次のルールにしたがって、動物を全部見て回ります。
- まっすぐ前進し、分かれ道は左に進む
- もし行き止まりなら、後ろを向く
- 1と2を「スタート」に戻るまで繰り返す
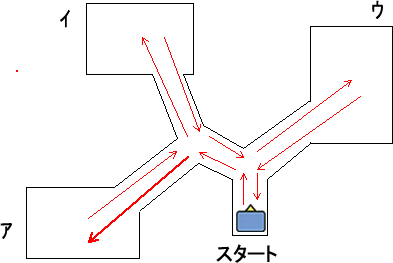
下の図は例です。ロボットはスタートから前進し、最初の分岐で左に曲がり、次の分岐でも左に曲がります。さらに前進すると「ア」に着き、「ア」は行き止まりなので、反転します。ロボットはこのように動いて、「ア」、「イ」、「ウ」の順にパトロールします。
ここで問題です。ロボットはどの順で動物園を巡回するでしょう?
論理を考える
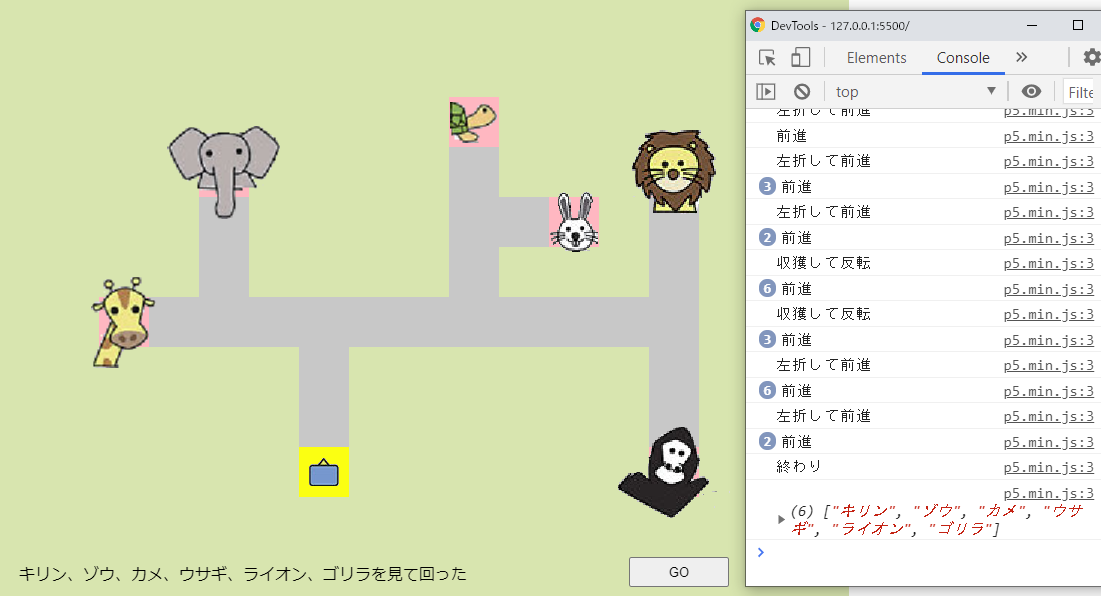
どの順で見て回るかは、動物園の地図を書いて、ルールにしたがって道をなぞって行けば簡単に分かります。下図に示すように、答えは「キリン、ゾウ、カメ、ウサギ、ライオン、ゴリラ」の順です。
ではロボットのこの動きをプログラミングで作成するには、どうすればよいでしょう?
迷路の解法
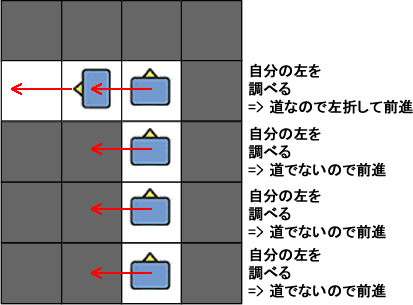
ロボットは上記ルールにしたがって動きますが、上図をよく見ると、道の左端に沿って前に進み、行き止まりで向きを逆に変えるという動きをつづけていることが分かります。これは、動物園の道が洞窟だとすると、左手をずっと洞窟の左の壁につけたまま離さずに前に進む動きで、迷路から脱出する方法と同じです。ウィキペディアには次のように書かれています。
迷路の解法
右手法(左手法)
右側の壁に手を付いて、ひたすら壁沿いに進むという方法である(右側の壁の代わりに左側の壁に手をついても本質的には同じ、この場合は左手法と言う)。
壁の切れ目は迷路の入口と出口にしかないので、右手法を使うと最終的には、入口に戻ってしまうか出口に到達するかのいずれかになる。
最短経路でゴールにたどりつけるとは限らないが、最悪でも壁の長さ分だけ歩けば終了する。
この方法(左手法)をお題に導入するには、ロボットの進行方向左を調べつづけます。左が道でないなら前進し、道なら左折するという戦略です。ロボットの左を調べつづけるには、「36:ロボットはどう動く」でも使用したグリッドが役立ちます。
地図をグリッドで表す
上記の例であげた地図を、「36:ロボットはどう動く」と似た方法で作成します。ただし今回は、地図の情報を持つ2次元配列を手作業でなく関数を使って作成します。
// グリッドを構成する行と列の数
const rows = 10;
const columns = 10;
// 矩形の一辺の長さ(正方形)
const w = 50;
// キャンバスの左端、上端からグリッド全体をずらす距離
const offsetX = 50;
const offsetY = 50;
// グリッドのセルの値を入れる配列
let grid = [];

function setup() {
    createCanvas(600, 600);
}

function draw() {
    background(220);
    drawCells();
}

// 矩形の描画とセルの設定
function drawCells() {
    drawGrid();
    setCell('start', 8, 5, color(255, 255, 0));
    setCell('road', 7, 5, color(255, 255, 255));
    setCell('road', 6, 5, color(255, 255, 255));
    setCell('road', 5, 5, color(255, 255, 255));
    setCell('road', 5, 4, color(255, 255, 255));
    setCell('road', 5, 3, color(255, 255, 255));
    setCell('road', 5, 2, color(255, 255, 255));
    setCell('ア', 5, 1, color(255, 182, 193));
    setCell('road', 4, 3, color(255, 255, 255));
    setCell('road', 3, 3, color(255, 255, 255));
    setCell('イ', 2, 3, color(255, 182, 193));
    setCell('road', 5, 6, color(255, 255, 255));
    setCell('road', 5, 7, color(255, 255, 255));
    setCell('ウ', 5, 8, color(255, 182, 193));
}

// grid配列に値を設定し、それに相当する矩形を新たに描画
function setCell(val, r, c, col) {
    grid[r][c] = val;
    const x = offsetX + c * w;
    const y = offsetY + r * w;
    fill(col);
    rect(x, y, w, w);
    fill(0);
    // セルの値を描画
    text(val, x + 12, y + 30);
}

// rows x columns のグリッドを描画する
function drawGrid() {
    for (let r = 0; r < rows; r++) {
        // rows分の空の配列を作成
        grid[r] = [];
        for (let c = 0; c < columns; c++) {
            // 空の各配列に、columns個の'block'を要素として入れる
            grid[r][c] = 'block';
            // 描画する矩形の(x,y)位置
            const x = offsetX + c * w;
            const y = offsetY + r * w;
            fill(150);
            // 矩形を描画
            rect(x, y, w, w);
            // 2次元配列でのインデックス位置
            const txt = r + ',' + c;
            fill(0);
            text(txt, x + 12, y + 30);
        }
    }
}
上記コードからは下図のグリッドが描画できます。
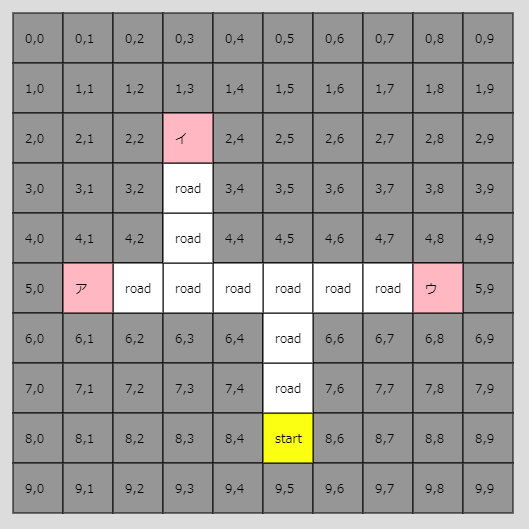
drawGrid()関数はrowsとcolumns変数で指定されたrows x columns のグリッドを描画し、グリッドに対応する2次元配列gridの内側の配列に’block’を要素として入れます。またセルの位置を特定しやすいように行と列の番号も描きます。
setCell()関数は、指定された文字列と、行と列の番号、カラーを使って、グリッドに対応するgridの内側の配列に文字列を設定し(これにより’block’が上書きされます)、グリッドのセルを着色してセルと文字列を描画します。道や巡回先が多いとsetCell()関数を呼び出す回数も多くなります。
また、ロボットは移動するので、(ロボットの移動の軌跡を残したい場合以外は)、draw()関数内でdrawGrid()とsetCell()関数を呼び出す必要があります。
Robotクラス
ロボットがどう動くかは、メインのsketch.jsのコードからでなく、ロボットのクラスを作ってそこから動かすようにした方が、分かりやすくなります。
メインのsketch.jsのコードからの操作は、たとえて言うなら神様の視点で、ロボットに前進しろ、左に曲がれ、と命令するようなものです。ロボットには前と後ろがあり、前の方に向いて前進し、前の方向を基準に左折するので、神様の視点でなく、ロボットの主観で操作した方が混乱が少なくて済みます。
コンストラクタ
ロボットには次のようなプロパティ変数が必要になります。それぞれの役割はコメントとして書き加えているので参考にしてください。
constructor(r, c, map, imgs) {
    this.r = r; // 今いる行番号
    this.c = c; // 今いる列番号
    this.currentDirection = 0; // 現在向いている方向の番号
    this.directionList = ['north', 'east', 'south', 'west']; // 方向を配列で保持する
    this.direction = this.directionList[0]; // => 0 は'north'
    this.step = 50; //  定数wの値
    this.map = map; // 二次元配列
    this.imgs = imgs; // ロボットのイメージ 上、右、下、左向きの順
    this.offsetX = 50; // オフセット値はdrawGrid()関数のオフセット値と同じにする
    this.offsetY = 50;
    this.x = this.c * this.step + this.step / 2 + this.offsetX; // 描画に使用する(x,y)位置
    this.y = this.r * this.step + this.step / 2 + this.offsetY;
    this.founded = []; // 見つけたものを集める配列
}
ここでのポイントは、currentDirectionプロパティです(0,1,2,3の間で変化します)。image(this.imgs[this.currentDirection],…)とすることで、現在の方向を向いているロボットが描画でき、this.direction = this.directionList[this.currentDirection]とすることで、ロボットの現在の方向も設定できます。
前進するgoForward()メソッド
「36:ロボットはどう動く」の「前進するとは?」で述べているように、現在の方向に前進するには、今向いている方向の情報が必要です。これはdirectionプロパティで分かります。
左を向くturnToLeft()メソッド
左を向くとは、今の進行方向左に向きを変えることです。今北を向いているなら西、東を向いているなら北に向きを変えることです。
directionList配列には[‘north’, ‘east’, ‘south’, ‘west’]の順で方向の文字列が入っているので、currentDirectionをインデックス番号に使うことで、directionプロパティが設定できます。 currentDirectionの値に3を足すと、directionの値を’north’なら’west’に、’east’なら’north’に変えることができます。
turnToLeft() {
    this.currentDirection += 3;
    if (this.currentDirection > this.directionList.length - 1) {
        this.currentDirection = this.currentDirection - this.directionList.length;
    }
    this.direction = this.directionList[this.currentDirection];
}
反転するreverse()メソッド
逆の方向を向くとは、今の進行方向を逆にするということです。これは、turnToLeft()と同じ要領で、currentDirectionプロパティに2を足すことで実現できます。
reverse() {
    this.currentDirection += 2;
    if (this.currentDirection > this.directionList.length - 1) {
        this.currentDirection = this.currentDirection - this.directionList.length;
    }
    this.direction = this.directionList[this.currentDirection];
}
今いるセルと左と前のセルを調べて次の動きを決めるcheckCellsAndMove()メソッド
迷路の解法の「左手法」を実行するのがこのメソッドです。
checkCellsAndMove() {
    let leftCell; // 進行方向左にあるセル
    let frontCell; // 進行方向1つ前にあるセル
    const currentCell = this.map[this.r][this.c]; // 今いるセル
    // 今いるセルが'ア'か'イ'か'ウ'なら、そこは巡回地点
    if (currentCell === 'ア' || currentCell === 'イ' || currentCell === 'ウ') {
        print('収獲して反転');
        this.founded.push(currentCell);
        this.reverse();
    }
    // 今の進行方向に応じて、左のセルと前のセルを調べる
    switch (this.direction) {
        // 北に進んでいる場合
        case 'north':
            leftCell = this.map[this.r][this.c - 1];
            frontCell = this.map[this.r - 1][this.c];
            break;
            // 西
        case 'west':
            leftCell = this.map[this.r + 1][this.c];
            frontCell = this.map[this.r][this.c - 1];
            break;
            // 南
        case 'south':
            leftCell = this.map[this.r][this.c + 1];
            frontCell = this.map[this.r + 1][this.c];
            break;
            // 東
        case 'east':
            leftCell = this.map[this.r - 1][this.c];
            frontCell = this.map[this.r][this.c + 1];
            break;
    }
    // 左のセルがblockなら
    if (leftCell === 'block') {
        // そのまま前進
        this.goForward();
        print('前進');
        // そうでなくroadなら
    }
    else if (leftCell === 'road') {
        // 左を向いて前進
        this.turnToLeft();
        this.goForward();
        print('左折して前進');
    }
    // 1周して戻ったときの処理
    if (frontCell === 'start') {
        this.reverse();
        print('終わり');
        print(this.founded);
        // タイマーをクリアして終了
        window.clearInterval(this.timer);
    }
}
ロボットはこのif文で、左のセルがblockなら前進し、そうでなくroadなら左を向いて前進します。実にシンプルです。また左のセルとは関係なく、前のセルがstartなら1周したということなので、ここで終わりです。
例の全コード
ここまでをまとめ、ボタンのクリックでロボットが巡回を開始するようにした全コードを以下に示します。[コンソール]にはロボットの動きが出力され、巡回が終わると、収獲物として’ア’と’イ’、’ウ’が表示されます。
// グリッドを構成する行と列の数
const rows = 10;
const columns = 10;
// 矩形の一辺の長さ(正方形)
const w = 50;
// キャンバスの左端、上端からグリッド全体をずらす距離
const offsetX = 50;
const offsetY = 50;
// グリッドのセルの値を入れる配列
let grid = [];

let robot;
let robotImages;

function preload() {
    const robotImage0 = loadImage('images/robotN.png');
    const robotImage1 = loadImage('images/robotE.png');
    const robotImage2 = loadImage('images/robotS.png');
    const robotImage3 = loadImage('images/robotW.png');
    robotImages = [robotImage0, robotImage1, robotImage2, robotImage3];
}

function setup() {
    createCanvas(600, 600);
    imageMode(CENTER);
    // Robotクラスのインスタンスを作成
    robot = new Robot(8, 5, grid, robotImages);
    // [GO!]ボタン
    const goButton = setButton('GO', {
        x: 450,
        y: 600
    });
    // マウスプレスでスタート
    goButton.mousePressed(() => {
        // 2秒に1回、ロボットは自分の周りのセルを調べ、それに応じた行動を取る
        const timerID = window.setInterval(() => {
            robot.checkCellsAndMove();
            robot.update();
        }, 2000);
        // ロボットにタイマーIDを教える
        robot.setTimerID(timerID);
    });
}

function draw() {
    background(220);
    drawCells();
    robot.display();
}

// 矩形の描画とセルの設定
function drawCells() {
    drawGrid();
    setCell('start', 8, 5, color(255, 255, 0));
    setCell('road', 7, 5, color(255, 255, 255));
    setCell('road', 6, 5, color(255, 255, 255));
    setCell('road', 5, 5, color(255, 255, 255));
    setCell('road', 5, 4, color(255, 255, 255));
    setCell('road', 5, 3, color(255, 255, 255));
    setCell('road', 5, 2, color(255, 255, 255));
    setCell('ア', 5, 1, color(255, 182, 193));
    setCell('road', 4, 3, color(255, 255, 255));
    setCell('road', 3, 3, color(255, 255, 255));
    setCell('イ', 2, 3, color(255, 182, 193));
    setCell('road', 5, 6, color(255, 255, 255));
    setCell('road', 5, 7, color(255, 255, 255));
    setCell('ウ', 5, 8, color(255, 182, 193));
}

// grid配列に値を設定し、それに相当する矩形を新たに描画
function setCell(val, r, c, col) {
    grid[r][c] = val;
    const x = offsetX + c * w;
    const y = offsetY + r * w;
    fill(col);
    rect(x, y, w, w);
    fill(0);
    // セルの値を描画
    text(val, x + 12, y + 30);
}

// rows x columns のグリッドを描画する
function drawGrid() {
    for (let r = 0; r < rows; r++) {
        // rows分の空の配列を作成
        grid[r] = [];
        for (let c = 0; c < columns; c++) {
            // 空の各配列に、columns個の'block'を要素として入れる
            grid[r][c] = 'block';
            // 描画する矩形の(x,y)位置
            const x = offsetX + c * w;
            const y = offsetY + r * w;
            fill(150);
            // 矩形を描画
            rect(x, y, w, w);
            // 2次元配列でのインデックス位置
            const txt = r + ',' + c;
            fill(0);
            text(txt, x + 12, y + 30);
        }
    }
}

function setButton(label, pos) {
    const button = createButton(label);
    button.size(100, 30);
    button.position(pos.x, pos.y);
    return button;
}

// Robotクラス
class Robot {
    constructor(r, c, map, imgs) {
            this.r = r; // 今いる行番号
            this.c = c; // 今いる列番号
            this.currentDirection = 0; // 現在向いている方向の番号
            this.directionList = ['north', 'east', 'south', 'west']; // 方向を配列で保持する
            this.direction = this.directionList[0]; // => 0 は'north'
            this.step = 50; //  定数wの値
            this.map = map; // 二次元配列
            this.imgs = imgs; // ロボットのイメージ 上、右、下、左向きの順
            this.offsetX = 50; // オフセット値はdrawGrid()関数のオフセット値と同じにする
            this.offsetY = 50;
            this.x = this.c * this.step + this.step / 2 + this.offsetX; // 描画に使用する(x,y)位置
            this.y = this.r * this.step + this.step / 2 + this.offsetY;
            this.founded = []; // 見つけたものを集める配列
        }
        // 描画
    display() {
            image(this.imgs[this.currentDirection], this.x, this.y);
        }
        // 更新 => ロボットはthis.rかthis.cに変化があると移動する
    update() {
            this.x = this.c * this.step + this.step / 2 + this.offsetX;
            this.y = this.r * this.step + this.step / 2 + this.offsetY;
        }
        // タイマーIDをメモしておく => タイマーのクリアに使用する
    setTimerID(timer) {
            this.timer = timer;
        }
        // 前に進む: 今向かっている方向のまま進むこと
    goForward() {
        switch (this.direction) {
            case 'north':
                this.r--; // 方向がnorthなら上に1つ進む
                break;
            case 'east':
                this.c++; // 方向がeastなら右に1つ進む
                break;
            case 'south':
                this.r++; // 方向がsouthなら下に1つ進む
                break;
            case 'west':
                this.c--; // 方向がwestなら左に1つ進む
                break;
        }
    }

    // 左を向く:今の進行方向を左に90度変えること
    // 北なら西、東なら北
    turnToLeft() {
        // 今の方向に3を足す(大きい場合は調整する)
        // directionList配列は['north', 'east', 'south', 'west']の順。
        this.currentDirection += 3;
        if (this.currentDirection > this.directionList.length - 1) {
            this.currentDirection = this.currentDirection - this.directionList.length;
        }
        this.direction = this.directionList[this.currentDirection];
    }

    // 反転する:進行方向を逆にする
    reverse() {
        // 今の方向に2を足す(大きい場合は調整する)
        this.currentDirection += 2;
        if (this.currentDirection > this.directionList.length - 1) {
            this.currentDirection = this.currentDirection - this.directionList.length;
        }
        this.direction = this.directionList[this.currentDirection];
    }

    // 周りのセルを調べて進む
    checkCellsAndMove() {
        let leftCell; // 進行方向左にあるセル
        let frontCell; // 進行方向1つ前にあるセル
        const currentCell = this.map[this.r][this.c]; // 今いるセル
        // 今いるセルが'ア'か'イ'か'ウ'なら、そこは巡回地点
        if (currentCell === 'ア' || currentCell === 'イ' || currentCell === 'ウ') {
            print('収獲して反転');
            this.founded.push(currentCell);
            this.reverse();
        }
        // 今の進行方向に応じて、左のセルと前のセルを調べる
        switch (this.direction) {
            // 北に進んでいる場合
            case 'north':
                leftCell = this.map[this.r][this.c - 1];
                frontCell = this.map[this.r - 1][this.c];
                break;
                // 西
            case 'west':
                leftCell = this.map[this.r + 1][this.c];
                frontCell = this.map[this.r][this.c - 1];
                break;
                // 南
            case 'south':
                leftCell = this.map[this.r][this.c + 1];
                frontCell = this.map[this.r + 1][this.c];
                break;
                // 東
            case 'east':
                leftCell = this.map[this.r - 1][this.c];
                frontCell = this.map[this.r][this.c + 1];
                break;
        }
        // 左のセルがblockなら
        if (leftCell === 'block') {
            // そのまま前進
            this.goForward();
            print('前進');
            // そうでなくroadなら
        }
        else if (leftCell === 'road') {
            // 左を向いて前進
            this.turnToLeft();
            this.goForward();
            print('左折して前進');
        }
        // 1周して戻ったときの処理
        if (frontCell === 'start') {
            this.reverse();
            print('終わり');
            print(this.founded);
            // タイマーをクリアして終了
            window.clearInterval(this.timer);
        }
    }
}
以下は実際の実行画面です。
お題を左手法で解決する全コード
では、お題の動物園を巡回するコードを見ていきましょう。基本的なコードはでき上がっているので、後は動物のイメージを描画したり、実際には不要な文字などを表示しないようにすればよいだけです。
とは言え、1つ気になる点があります。それは、巡回先が固定的であることです。もし’ア’でなく、’A’に変わったら、ロボットのコードを書きかえる必要が出てきます。動物園で言うと、’キリン’でなく’カバ’にしたい場合、ロボットのプログラムを書きかえることになります。そこで、以下のコードでは、動物のセルに移動したらその動物名を調べてそれをメモするという方法に変更することにします。
// グリッドを構成する行と列の数
const rows = 10;
const columns = 14;
// 矩形の一辺の長さ(正方形)
const w = 50;
// キャンバスの左端、上端からグリッド全体をずらす距離
const offsetX = 50;
const offsetY = 50;
// グリッドのセルの値を入れる配列
let grid = [];

let robot;
let robotImages;

// 動物のセル関連(名前、位置、イメージ、配列、カラー)
let animalsName = ['キリン', 'ゾウ', 'カメ', 'ウサギ', 'ライオン', 'ゴリラ'];
let animalsPos = [
    [5, 1],
    [2, 3],
    [1, 8],
    [3, 10],
    [2, 12],
    [8, 12]
];
let animalImages;
let animalMaps = [];
let animalCellColor;

function preload() {
    const robotImage0 = loadImage('images/robotN.png');
    const robotImage1 = loadImage('images/robotE.png');
    const robotImage2 = loadImage('images/robotS.png');
    const robotImage3 = loadImage('images/robotW.png');
    robotImages = [robotImage0, robotImage1, robotImage2, robotImage3];

    const animalImage0 = loadImage('images/kirin.png');
    const animalImage1 = loadImage('images/zou.png');
    const animalImage2 = loadImage('images/kame.png');
    const animalImage3 = loadImage('images/usagi.png');
    const animalImage4 = loadImage('images/lion.png');
    const animalImage5 = loadImage('images/gorilla.png');
    animalImages = [animalImage0, animalImage1, animalImage2, animalImage3, animalImage4, animalImage5];
}

function setup() {
    createCanvas(850, 600);
    imageMode(CENTER);
    noStroke();
    animalCellColor = color(255, 182, 193);
    // 動物のセルに使用するMapオブジェクトを作成し、配列に追加
    for (let i = 0; i < animalsName.length; i++) {
        const map = new Map();
        map.set('name', animalsName[i]);
        map.set('pos', animalsPos[i]);
        map.set('image', animalImages[i]);
        animalMaps.push(map);
    }

    // Robotクラスのインスタンスを作成
    robot = new Robot(8, 5, grid, robotImages);
    // [GO!]ボタン
    const goButton = setButton('GO', {
        x: 630,
        y: 560
    });
    // マウスプレスでスタート
    goButton.mousePressed(() => {
        // 2秒に1回、ロボットは自分の周りのセルを調べ、それに応じた行動を取る
        const timerID = window.setInterval(() => {
            robot.checkCellsAndMove();
            robot.update();
        }, 2000);
        // ロボットにタイマーIDを教える
        robot.setTimerID(timerID);
    });
}

function draw() {
    background(218, 228, 175);
    drawCells();
    robot.display();
}

// 矩形の描画とセルの設定
function drawCells() {
    drawGrid();
    setCell('start', 8, 5, color(255, 255, 0));
    setCell('road', 7, 5);
    setCell('road', 6, 5);
    setCell('road', 5, 5);
    setCell('road', 5, 4);
    setCell('road', 5, 3);
    setCell('road', 5, 2);
    setCell('road', 4, 3);
    setCell('road', 3, 3);
    setCell('road', 5, 6);
    setCell('road', 5, 7);
    setCell('road', 5, 8);
    setCell('road', 4, 8);
    setCell('road', 3, 8);
    setCell('road', 2, 8);
    setCell('road', 3, 9);
    setCell('road', 5, 9);
    setCell('road', 5, 10);
    setCell('road', 5, 11);
    setCell('road', 5, 12);
    setCell('road', 4, 12);
    setCell('road', 3, 12);
    setCell('road', 6, 12);
    setCell('road', 7, 12);
    drawAnimalSell();
}

// 動物のセルを描画する
function drawAnimalSell() {
    fill(animalCellColor);
    for (let i = 0; i < animalMaps.length; i++) {
        const map = animalMaps[i];
        const arr = map.get('pos');
        const img = map.get('image');
        const c = arr[1];
        const r = arr[0];
        // ピンクの矩形の描画
        const xr = offsetX + c * w;
        const yr = offsetY + r * w;
        rect(xr, yr, w, w);
        // イメージの描画
        const x = c * 50 + 50 / 2 + offsetX; // 描画に使用する(x,y)位置
        const y = r * 50 + 50 / 2 + offsetY;
        image(img, x, y);
        // gird2次元配列へのMapオブジェクトの登録
        grid[r][c] = map;
    }
}

// grid配列に値を設定し、それに相当する矩形を新たに描画
function setCell(val, r, c, col = color(200, 200, 200)) {
    grid[r][c] = val;
    const x = offsetX + c * w;
    const y = offsetY + r * w;
    fill(col);
    rect(x, y, w, w);
}

// rows x columns のグリッドを描画する
function drawGrid() {
    fill(218, 228, 175);
    for (let r = 0; r < rows; r++) {
        // rows分の空の配列を作成
        grid[r] = [];
        for (let c = 0; c < columns; c++) {
            // 空の各配列に、columns個の'block'を要素として入れる
            grid[r][c] = 'block';
            // 描画する矩形の(x,y)位置
            const x = offsetX + c * w;
            const y = offsetY + r * w;
            rect(x, y, w, w);
        }
    }
}

function showReport(arr) {
    const p = createP();
    let txt = '';
    for (let i = 0; i < arr.length - 1; i++) {
        txt += arr[i] + '、';
    }
    txt += arr[arr.length - 1] + 'を見て回った';
    p.html(txt);
    p.position(20, 550);
}

function setButton(label, pos) {
    const button = createButton(label);
    button.size(100, 30);
    button.position(pos.x, pos.y);
    return button;
}

// Robotクラス
class Robot {
    constructor(r, c, map, imgs) {
            this.r = r; // 今いる行番号
            this.c = c; // 今いる列番号
            this.currentDirection = 0; // 現在向いている方向の番号
            this.directionList = ['north', 'east', 'south', 'west']; // 方向を配列で保持する
            this.direction = this.directionList[0]; // => 0 は'north'
            this.step = 50; //  定数wの値
            this.map = map; // 二次元配列
            this.imgs = imgs; // ロボットのイメージ 上、右、下、左向きの順
            this.offsetX = 50; // オフセット値はdrawGrid()関数のオフセット値と同じにする
            this.offsetY = 50;
            this.x = this.c * this.step + this.step / 2 + this.offsetX; // 描画に使用する(x,y)位置
            this.y = this.r * this.step + this.step / 2 + this.offsetY;
            this.founded = []; // 見つけたものを集める配列
        }
        // 描画
    display() {
            image(this.imgs[this.currentDirection], this.x, this.y);
        }
        // 更新 => ロボットはthis.rかthis.cに変化があると移動する
    update() {
            this.x = this.c * this.step + this.step / 2 + this.offsetX;
            this.y = this.r * this.step + this.step / 2 + this.offsetY;
        }
        // タイマーIDをメモしておく => タイマーのクリアに使用する
    setTimerID(timer) {
            this.timer = timer;
        }
        // 前に進む: 今向かっている方向のまま進むこと
    goForward() {
        switch (this.direction) {
            case 'north':
                this.r--; // 方向がnorthなら上に1つ進む
                break;
            case 'east':
                this.c++; // 方向がeastなら右に1つ進む
                break;
            case 'south':
                this.r++; // 方向がsouthなら下に1つ進む
                break;
            case 'west':
                this.c--; // 方向がwestなら左に1つ進む
                break;
        }
    }

    // 左を向く:今の進行方向を左に90度変えること
    // 北なら西、東なら北
    turnToLeft() {
        // 今の方向に3を足す(大きい場合は調整する)
        // directionList配列は['north', 'east', 'south', 'west']の順。
        this.currentDirection += 3;
        if (this.currentDirection > this.directionList.length - 1) {
            this.currentDirection = this.currentDirection - this.directionList.length;
        }
        this.direction = this.directionList[this.currentDirection];
    }

    // 反転する:進行方向を逆にする
    reverse() {
        // 今の方向に2を足す(大きい場合は調整する)
        this.currentDirection += 2;
        if (this.currentDirection > this.directionList.length - 1) {
            this.currentDirection = this.currentDirection - this.directionList.length;
        }
        this.direction = this.directionList[this.currentDirection];
    }

    // 周りのセルを調べて進む
    checkCellsAndMove() {
        let leftCell; // 進行方向左にあるセル
        let frontCell; // 進行方向1つ前にあるセル
        const currentCell = this.map[this.r][this.c]; // 今いるセル
        // 今いるのが動物のセル(Mapオブジェクト)なら
        if (currentCell instanceof Map) {
            print('収獲して反転');
            this.founded.push(currentCell.get('name'));
            this.reverse();
        }

        // 今の進行方向に応じて、左のセルと前のセルを調べる
        switch (this.direction) {
            // 北に進んでいる場合
            case 'north':
                leftCell = this.map[this.r][this.c - 1];
                frontCell = this.map[this.r - 1][this.c];
                break;
                // 西
            case 'west':
                leftCell = this.map[this.r + 1][this.c];
                frontCell = this.map[this.r][this.c - 1];
                break;
                // 南
            case 'south':
                leftCell = this.map[this.r][this.c + 1];
                frontCell = this.map[this.r + 1][this.c];
                break;
                // 東
            case 'east':
                leftCell = this.map[this.r - 1][this.c];
                frontCell = this.map[this.r][this.c + 1];
                break;
        }
        // 左のセルがblockなら
        if (leftCell === 'block') {
            // そのまま前進
            this.goForward();
            print('前進');
            // そうでなくroadなら
        }
        else if (leftCell === 'road') {
            // 左を向いて前進
            this.turnToLeft();
            this.goForward();
            print('左折して前進');
        }
        // 1周して戻ったときの処理
        if (frontCell === 'start') {
            this.reverse();
            print('終わり');
            print(this.founded);
            // タイマーをクリアして終了
            window.clearInterval(this.timer);
            this.report(this.founded);
        }
    }
    report(arr) {
        showReport(arr);
    }
}
上記コードではまた、巡回が終わった時点で、巡回先であつめた情報(動物名)をキャンバス上に表示する機能も加えています。前の例のコードでは、setCell()関数に渡す引数に違いがありましたが、上記コードではほとんどが’road’なので、setCell()関数を呼び出す行数はもっと減らすことができます。