本稿は、毎日新聞の「プログラミング・はじめの一歩」とは関係のないオリジナル記事です。
目次
当たり判定とは?
当たり判定とは、衝突判定、衝突検出とも呼ばれ、英語ではCollision Detectionと言います。ウィキペディアには、次のように記述されています。
衝突判定(しょうとつはんてい、Collision Detection)とは、「2つ以上のオブジェクトの交差を検出する」という計算機科学上の問題であり、具体的には「ある物体が別の物体に当たったか(衝突したか)どうか」を判定するプログラム処理のことを指す。ロボット工学、計算物理学、コンピュータゲーム、コンピュータシミュレーション、計算幾何学など、さまざまなコンピューティング分野で応用されている。
衝突判定のアルゴリズムは、2Dオブジェクト同士の衝突判定と3Dオブジェクト同士の衝突判定に分けることができる。
たとえば下図は「ポン」と呼ばれるビデオ版エアホッケーゲームのスクリーンショットです。このゲームでは、左右にあるパドルをマウスで操作して、ボールを跳ね返しますが、ボールがパドルに当たった瞬間を知る必要があります。これを行うのが当たり判定です。
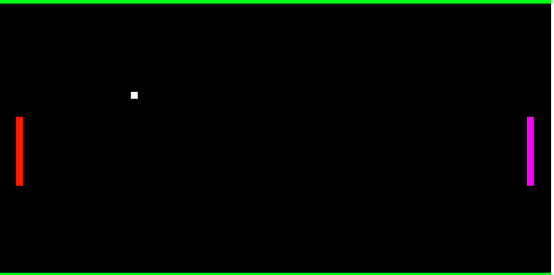
このゲームは、次のリンクのクリックで実際にプレイできます。「ポン」。ゲームの詳細は「9_1:p5.play 「ポン」 ゲームサンプル」で読むことができます。
また下図のプログラムでは、マウスのクリックで弾が発射され、鳥の怪物に命中すると、鳥は落下します。この場合には、弾と鳥の間で当たり判定を行い、当たった瞬間に鳥の挙動を変えています。
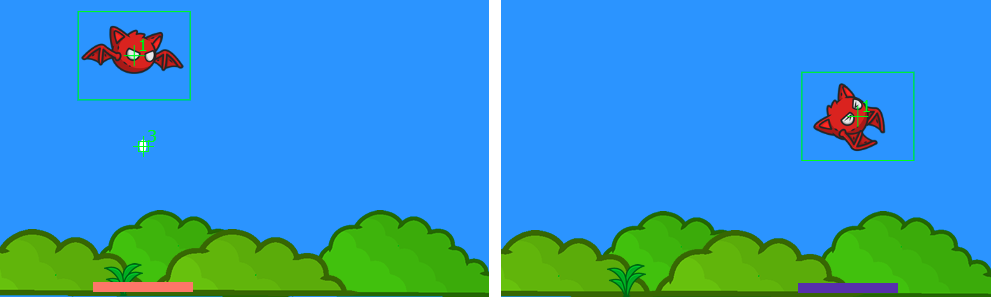
このプログラムの詳細は「7_1:p5.play スプライトの当たり判定」で読むことができます。
当たり判定はプログラムに動的な効果をもたらすテクニックで、アクションゲームを作りたい場合には必ず必要になります。上記2つの例では、p5.jsのライブラリであるp5.playの機能を使って当たり判定を行っていますが、以下では、p5.playを使わない、当たり判定の基本的な考え方を見ていきます。
p5.jsでの当たり判定
p5.jsでの当たり判定は、p5.jsのキャンバスに描画する描画物同士の当たり判定です。キャンバスに描かれるパドルや球、鳥の怪物は描画による結果で、そこに実際に存在するわけではありません。キャンバスの描画は一瞬一瞬で変化するので、高い頻度で、描画物の描画領域の一部が別のの描画物の描画領域の一部と重なっていないかを調べることになります。
JavaScriptやp5.jsに、たとえばhitTest()といった、当たり判定を専門に行う関数やメソッドはありません。当たり判定は驚くほど基本的で地味な計算で行われます。
円と円の当たり判定
最も分かりやすく、判定が簡単な円同士の当たり判定から見ていきましょう。
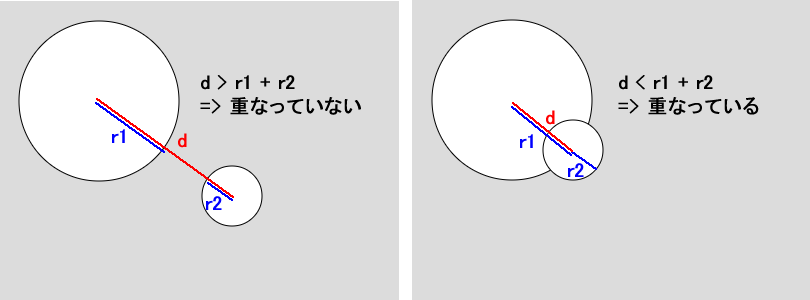
円同士が当たっているかどうか、言い換えると重なっているかどうかは、
- 2つの円の中心間の距離を計る
- この距離が2つの円の半径の合計より小さいなら2つの円は重なっていることになる
といういたってシンプルな考え方で判定できます。
下図はこれを説明するための図で、dは大きな円の中心と小さな円の中心とを結んだ線の長さです。これが、大きな円の半径r1と小さな円の半径r2の合計より大きければ、2つの円はr1+r2より離れていることになるので、当たっていないことになります。
点(ax,ay)を中心とする半径arの円と、点(bx,by)を中心とする半径brの円の当たり判定を行うコードは次のように記述できます。
// 当たり判定
function collisionDetect() {
    // 2つの円の中心間の距離を計る(d)
    // この距離が2つの円の半径の合計より小さいなら2つの円は重なっていることになる
    const d = dist(ax, ay, bx, by);
    if (d < ar + br) {
        print('当たり');
    }
}dist()はp5.jsの関数で、与えられた2点間の距離を計算します(「dist()」を参照)。
次のコードは簡単な例です。小さな円をマウスで移動して当たり判定を行います。2つの円が重なっていると画面右下に”当たり”が描画されます。
let ax, ay, ar; // 大きい方の円に使用する変数
let bx, by, br; // マウスに合わせて動く円に使用する変数

function setup() {
    createCanvas(400, 300);
    // 半径モード => ellips()で半径が指定できるモード
    ellipseMode(RADIUS);
    ax = 100, ay = 100, ar = 80;
    bx = 10, by = 10, br = 30;
}

function draw() {
        background(220);
        // 大きい方の円を描画
        ellipse(ax, ay, ar);
        // カーソル位置に小さい方の円を描画
        bx = mouseX, by = mouseY;
        ellipse(bx, by, br);
        // 当たり判定
        collisionDetect();
    }
    // 当たり判定
function collisionDetect() {
    // 2つの円の中心間の距離を計る(d)
    // この距離が2つの円の半径の合計より小さいなら2つの円は重なっていることになる
    const d = dist(ax, ay, bx, by);
    if (d < ar + br) {
        showInfo('当たり');
    }
}

function showInfo(txt) {
    text(txt, width - 50, height - 20);
}
下は実行画面です。
次のプログラムでは、小さな円が大きな円に重なると、大きな円の色が変化します。円の反応を行いやすくするために円のクラスを作成してします。
let c1, c2;

function setup() {
    createCanvas(400, 300);
    ellipseMode(RADIUS);
    // 大きい方の円とカーソルに追随する小さな円
    c1 = new Circle(100, 100, 80);
    c2 = new Circle(0, 0, 30, color('yellow'));

}

function draw() {
    background(220);
    // 小さな円の変数を更新
    c2.update(mouseX, mouseY);
    c1.display();
    // 小さな円は、大きい方の円の上に重ねたいので、大きい方の円より後で描く
    c2.display();
    // 当たり判定
    collisionDetect();
}

// 当たり判定
function collisionDetect() {
    // 2つの円の中心間の距離を計る(d)
    // この距離が2つの円の半径の合計より小さいなら2つの円は重なっていることになる
    const d = dist(c1.x, c1.y, c2.x, c2.y);
    if (d < c1.r + c2.r) {
        // print('当たり');
        // 大きい方の円の色を変える
        c1.changeColor();
    }
}

class Circle {
    constructor(x, y, r, col = color(255, 255, 255)) {
        this.x = x;
        this.y = y;
        this.r = r;
        this.color = col;
    }
    display() {
            fill(this.color);
            ellipse(this.x, this.y, this.r);
        }
        // xとyを更新 => mouseXとmouseYを与えると、カーソルに追随する
    update(x, y) {
            this.x = x;
            this.y = y;
        }
        // 塗り色をランダムに変える
    changeColor() {
        const col = color(random(255), random(255), random(255));
        this.color = col;
    }
}
下は実行画面です。
矩形と矩形の当たり判定
矩形同士の当たり判定は円のときより複雑ですが、考え方自体は小学生の算数レベルです。
それは、左上隅を(0,0)とする座標システムで、矩形1と矩形2の当たり判定を行うとき、
- 矩形1の左端が矩形2の右端より小さく、かつ
- 矩形1の上端が矩形2の下端より小さく、かつ
- 矩形1の右端が矩形2の左端より大きく、かつ
- 矩形1の下端が矩形2の上端より大きい場合に
矩形1と矩形2は重なっていると言える、というものです。
下図を見ながら考えると、容易に理解できます。
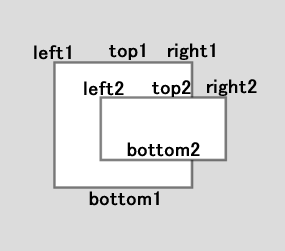
「矩形1の左端が矩形2の右端より小さく」というのは、left1がright2よりも左にあるということで、「矩形1の上端が矩形2の下端より小さく」というのは、top1がbottom2よりも上にあるということです。
また「矩形1の右端が矩形2の左端より大きく」というのは、right1がleft2よりも右にあるということで、「矩形1の下端が矩形2の上端より大きい」というのは、bottom1がtop2よりも下にあるということです。
そしてこれらの条件がすべて同時に満たされているとき、2つの矩形は重なっていると判定できる、ということです。
コードで表すと次のようになります。
if (left1 < right2 && top1 < bottom2 && right1 > left2 && bottom1 > top2) {
    print('当たり');
}
少し面倒なのが、矩形の右端(right)と下端(bottom)です。左端(left)と上端(top)は、rect(x,y,w,h)関数に渡す、描画する矩形の左上隅に当たる(x,y)がそのまま使用できますが、右端はxに矩形の幅(w)を足し、下端にはyに矩形の高さ(h)を足して求める必要があります。
コードでは次のように記述できます。
const left1 = x1; // 矩形1の左端は矩形1のx位置
const right2 = x2 + w2 // 矩形2の右端は矩形2のx位置に矩形2の幅を足した位置
const top1 = y1; // 矩形1の上端は矩形1のy位置
const bottom2 = y2 + h2; // 矩形2の下端は矩形2のy位置に矩形2の高さを足した位置

const right1 = x1 + w1; // 矩形1の右端は矩形1のx位置に矩形1の幅を足した位置
const left2 = x2; // 矩形2の左端は矩形2のx位置
const bottom1 = y1 + h1; // 矩形1の下端は矩形1のy位置に矩形1の高さを足した位置
const top2 = y2; // 矩形2の上端は矩形2のy位置
前の円同士の当たり判定と同じように、マウスで矩形を動かすことで矩形同士の当たり判定を行うコードは、次のように記述できます。
let x1, y1, w1, h1; // 大きい方矩形に使用する変数
let x2, y2, w2, h2; // / マウスに合わせて動く矩形に使用する変数

function setup() {
    createCanvas(400, 300);
    x1 = 150, y1 = 70, w1 = 110, h1 = 100;
    x2 = 0, y2 = 0, w2 = 100, h2 = 50;
}

function draw() {
    background(220);
    // 大きい方の矩形を描画
    rect(x1, y1, w1, h1);
    // カーソル位置に小さい方の矩形を描画
    x2 = mouseX, y2 = mouseY;
    rect(x2, y2, w2, h2);
    // 当たり判定
    collisionDetect();

}

function collisionDetect() {
    /*
    左上隅を(0,0)とする座標システムで、
    矩形1の左端が矩形2の右端より小さく、かつ
    矩形1の上端が矩形2の下端より小さく、かつ
    矩形1の右端が矩形2の左端より大きく、かつ
    矩形1の下端が矩形2の上端より大きい場合、
    矩形1と矩形2は重なっていると言える

    left1 < right2 && top1 < bottom2 && right1 > left2 && bottom1 > top2
    */

    const left1 = x1; // 矩形1の左端は矩形1のx位置
    const right2 = x2 + w2 // 矩形2の右端は矩形2のx位置に矩形2の幅を足した位置
    const top1 = y1; // 矩形1の上端は矩形1のy位置
    const bottom2 = y2 + h2; // 矩形2の下端は矩形2のy位置に矩形2の高さを足した位置

    const right1 = x1 + w1; // 矩形1の右端は矩形1のx位置に矩形1の幅を足した位置
    const left2 = x2; // 矩形2の左端は矩形2のx位置
    const bottom1 = y1 + h1; // 矩形1の下端は矩形1のy位置に矩形1の高さを足した位置
    const top2 = y2; // 矩形2の上端は矩形2のy位置

    if (left1 < right2 && top1 < bottom2 && right1 > left2 && bottom1 > top2) {
        showInfo('当たり');
    }
}

function showInfo(txt) {
    text(txt, width - 50, height - 20);
}
下は実行画面です。
次のプログラムでは、小さな矩形が大きな矩形に重なると、大きな矩形の色が変化します。当たり判定に必要なrightやleft、topやbottomを矩形を表すクラス(Rectangle)のプロパティにしておくと、当たり判定を行うときのコードが少し短くできます。
let rect1, rect2;

function setup() {
    createCanvas(400, 300);
    // 大きな矩形と、マウスに追随する小さな矩形を作成
    rect1 = new Rectangle(150, 70, 110, 100, color('green'));
    rect2 = new Rectangle(0, 0, 100, 50);
}

function draw() {
    background(220);
    rect1.display();
    // マウスに追随させる
    rect2.update(mouseX, mouseY);
    rect2.display();
    collisionDetect(rect1, rect2);
}

// 当たり判定
function collisionDetect(r1, r2) {
    // Rectangleオブジェクトのプロパティを使って当たり判定を行う
    if (r1.left < r2.right && r1.top < r2.bottom && r1.right > r2.left && r1.bottom > r2.top) {
        // print('当たり');
        // 大きな矩形に反応させる
        r1.changeColor();
    }
}

// RectAngleクラス
class Rectangle {
    constructor(x, y, w, h, col = color(255, 255, 255)) {
        this.x = x;
        this.y = y;
        this.w = w;
        this.h = h;
        this.color = col;

        this.top = this.y;
        this.bottom = this.y + this.h;
        this.left = this.x;
        this.right = this.x + this.w;

    }
    display() {
            fill(this.color);
            rect(this.x, this.y, this.w, this.h);
        }
        // プロパティを更新する
    update(x, y) {
        this.x = x;
        this.y = y;

        this.top = this.y;
        this.bottom = this.y + this.h;
        this.left = this.x;
        this.right = this.x + this.w;
    }
    changeColor() {
        const col = color(random(255), random(255), random(255));
        this.color = col;
    }
}
下は実行画面です。
イメージとイメージの当たり判定
p5.jsのImageオブジェクトに限らず、広くプログラミングに使用されるイメージは幅と高さの属性を持つ矩形で表されます。したがって、イメージ同士の衝突判定は、前述した矩形同士の衝突判定と同じ考え方で実現できます。
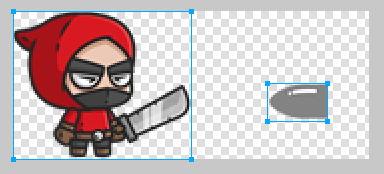
次のコード例では、画面のクリックで弾が右に進み、盗賊に命中します。命中すると盗賊は倒れ、弾は消えます。
let bandit1, images;
let bullet1, bulletImage;
function preload() {
const live = loadImage('images/live.png');
const dead = loadImage('images/dead.png');
images = [live, dead];
bulletImage = loadImage('images/bullet.png');
}
function setup() {
createCanvas(400, 300);
ellipseMode(RADIUS);
// 盗賊クラスのインスタンスを作成
bandit1 = new Bandit(10, 150, images);
// 弾クラスのインスタンスを作成
bullet1 = new Bullet(300, 200, bulletImage);
}
function draw() {
background(220);
bandit1.display();
bullet1.update();
bullet1.display();
// 当たり判定
collisionDetect(bandit1, bullet1)
}
// 当たり判定
function collisionDetect(bandit, bullet) {
// 弾は右から左に水平方向にしか移動しないので、この条件を調べるだけで済む
if (bandit.right > bullet.left) {
// print('当たり');
bandit.die();
bullet.hit();
}
}
function mousePressed() {
bullet1.shoot();
}
// 盗賊クラス
class Bandit {
constructor(x, y, imgs) {
this.x = x;
this.y = y;
this.images = imgs;
this.image = this.images[0];
this.top = this.y;
this.bottom = this.y + this.image.height;
this.left = this.x;
// 当たったように見える位置で当たりと判定させるためにright値を調整
this.right = this.x + this.image.width / 2 + 10;
}
display() {
image(this.image, this.x, this.y);
}
// 当たったら死ぬ
die() {
this.image = this.images[1];
}
}
// 弾クラス
class Bullet {
constructor(x, y, img) {
this.x = x;
this.y = y;
this.image = img;
this.top = this.y;
// 高さはイメージの高さ
this.bottom = this.y + this.image.height;
this.left = this.x;
// 幅はイメージの幅
this.right = this.x + this.image.width;
// 左に移動するスピード
this.speedX = -2;
// この弾が撃たれたかどうか
this.isShoot = false;
}
display() {
image(this.image, this.x, this.y);
}
update() {
if (this.isShoot) {
this.x += this.speedX;
this.top = this.y;
this.bottom = this.y + this.image.height;
this.left = this.x;
this.right = this.x + this.image.width;
}
}
shoot() {
if (!this.isShoot) {
this.isShoot = true;
}
}
// 当たったら画面外に移動させる
hit() {
this.x = 10000;
}
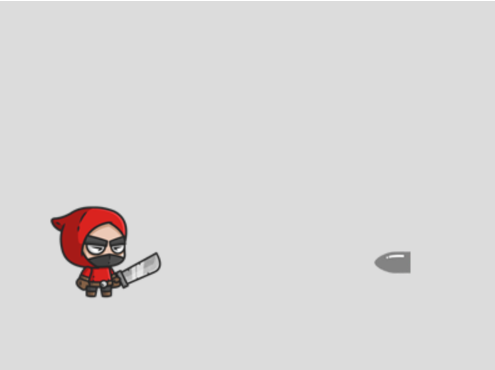
}下図は実行画面のスクリーンショットです。クリックすると実行画面が開きます。
盗賊を表すBulletと弾のBulletクラスには、前のRectangleクラスと同様、xやyのほか、topやbottom、left、rigthプロパティを設定しています。leftはthis.x、topはthis.yですが、rightはthis.xにイメージの幅(this.image.width)を足した値を、bottomにはthis.yにイメージの高さ(this.image.height)を足した値を設定しています。
this.top = this.y;
this.bottom = this.y + this.image.height;
this.left = this.x;
this.right = this.x + this.image.width;
また盗賊を囲む矩形には刀も含まれているので、弾が盗賊の体でなく刀に当たったように見える瞬間に当たりと判定されてしまいます。ここではこれを避けるため微調整しています。
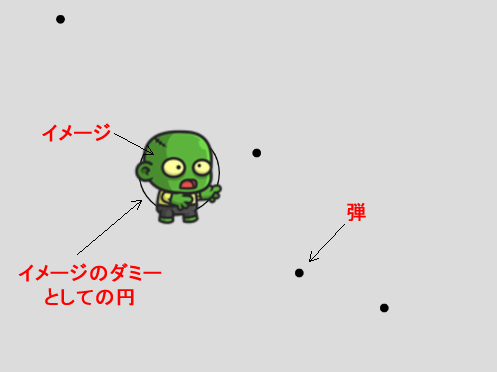
this.right = this.x + this.image.width / 2 + 10;イメージのダミーとの当たり判定
当たり判定にイメージを使わず、当たったように見える程度のサイズの円や矩形をイメージのダミーとして使って、当たり判定を行う方法があります。これは、一連のイメージでアニメーションするキャラクターへの当たり判定に有効な方法です。
下図のゾンビは左右に少しだけアニメーションします。当たり判定に正確を期すなら、高い頻度で変化するゾンビのイメージごとに、弾との当たり判定を行うわけですが、実際には、当たったように見える程度のサイズの円や矩形を代わりに使っても、弾のスピードが速いので、十分に当たって見えます。
以下はその例です。
let zombies = []; // ゾンビの一連のイメージを入れる配列
let zombie; // ゾンビインスタンス
let bullets = []; // 弾インスタンスを入れる配列
// ゾンビのイメージの代わりに当たり判定に使用する"境界円"
let boundingCircle;

function preload() {
    for (let i = 0; i < 12; i++) {
        const img = loadImage('images/z' + i + '.png');
        zombies.push(img);
    }
}

function setup() {
    createCanvas(400, 300);
    ellipseMode(RADIUS);
    zombie = new Zombie(100, 100, zombies);
    boundingCircle = new Circle(145, 140, 32);
}

function draw() {
    background(220);
    // 境界円は見せたくないので描画しない
    // 本番では削除する
    boundingCircle.display();
    zombie.display();
    // フレームカウント数を利用して、アニメーションを再生
    if (frameCount % 6 === 0) {
        zombie.loopAnimate();
    }
    // 弾のアニメーション
    if (bullets.length > 0) {
        for (let i = 0; i < bullets.length; i++) {
            const b = bullets[i]
            b.update(); // 位置を更新
            b.display(); // 描画
            // 弾がキャンバス左を超えたら弾の配列から削除する
            // => 描画されなくなるので消える
            if (b.x < -10) {
                const index = bullets.indexOf(b);
                bullets.splice(index, 1);
            }
        }
        // 当たり判定
        collisionDetect();
    }
}

// 当たり判定
function collisionDetect() {
    // 弾の配列を走査して、
    for (let i = 0; i < bullets.length; i++) {
        // 弾を特定し、
        const b = bullets[i];
        // 境界円と弾との当たり判定を行う
        const d = dist(boundingCircle.x, boundingCircle.y, b.x, b.y);
        if (d < boundingCircle.r + b.r) {
            print('当たり');
            // 当たりなら弾の配列から削除する
            // => 描画されなくなるので消える
            const index = bullets.indexOf(b);
            bullets.splice(index, 1);
        }
    }
}

function mousePressed() {
    // 弾インスタンスを作成して配列に追加し、スタート
    const bullet = new Bullet(mouseX, mouseY);
    bullets.push(bullet);
    bullet.shoot();
}

// ゾンビを表すクラス
class Zombie {
    constructor(x, y, imgs) {
            this.x = x;
            this.y = y;
            this.images = imgs;
            this.currentIndex = 0;
            this.image = this.images[this.currentIndex];
            this.imageLength = this.images.length;

        }
        // 描画
    display() {
            image(this.image, this.x, this.y);
        }
        // ループしてアニメーションする論理
    loopAnimate() {
        this.currentIndex++;
        if (this.currentIndex >= this.imageLength) {
            this.currentIndex = 0;
        }
        this.image = this.images[this.currentIndex];
    }
}

// 境界円のクラス ごく単純
class Circle {
    constructor(x, y, r) {
        this.x = x;
        this.y = y;
        this.r = r;
    }
    display() {
        noFill();
        ellipse(this.x, this.y, this.r);
    }
}


// 弾のクラス
class Bullet {
    constructor(x, y) {
        this.x = x;
        this.y = y;
        this.r = 3;
        this.speedX = -5;
        this.isShoot = false;
    }
    display() {
        fill(0);
        ellipse(this.x, this.y, this.r);
    }
    update() {
        if (this.isShoot) {
            this.x += this.speedX;
        }
    }
    shoot() {
        if (!this.isShoot) {
            this.isShoot = true;
        }
    }
}
下は実行画面です。画面のクリックでクリックした位置から弾が左に向けて飛び出します。弾は、ゾンビに命中するとそこで消え、命中しないものはそのまま画面外まで進みます。